|
COLOSTOMY IRRIGATION
What is Irrigation? Irrigation is another term for a water enema administered via the stoma. Colostomy patients who achieve good results with irrigation can be freed from wearing and changing standard colostomy bags. Only those with descending or sigmoid colostomies have the option of irrigating their ostomy. If your bowels tended to be irritable prior to surgery, irrigation may not work well for you. But if you were regular, or even prone to constipation before, you are a good candidate. One needs a reasonable amount of hand/eye coordination, the ability to learn a simple sequence of steps, and the motivation to control your body. Water is introduced into the large intestine, thereby flushing out waste and allowing the patient to regain control over elimination. Once mastered, the irrigation procedure can eliminate the need to wear bags. In many cases successful irrigators wear only a stoma cap, mini-pouch or patch to protect the ostomy in between irrigations. Irrigation is learned in the privacy of your own bathroom and requires a minimum of supplies (see photos at right). Some people irrigate every other day or longer, some every day. The process takes about an hour. You will need clearance/instruction from your surgeon and/or ET nurse before proceeding with this bowel management regime. In some cases, irrigation is contraindicated, ie the presence of further bowel disease, serious hernia, or poor hand/eye coordination. Do not attempt this procedure without clearance from your doctor or NSWOCC.* Irrigation Supplies Some ostomy manufacturers will send free samples of irrigation kits if asked. These will usually consist of a sleeve, mini-pouch and flange; you'll need to purchase the irrigation bag yourself as this is the most costly unit. Cost for the irrigation bag is around $80 Cdn; sleeves are around $10 each. Whether you choose a two or one piece sleeve is a matter of personal choice depending on what you wish to wear in between irrigations. Some irrigators choose a two piece sleeve (pictured at right) with a belt rather than a flange, eliminating the cost of flanges. Belts are about $15 Cdn; bags and belts last for years. Sleeves should be changed every few months. Standard Technique Irrigation is not an exact science -- as our bodies vary, so will your results and technique. The following is one standard method which you may modify according to your body's needs and reaction. First, the irrigation bag needs to be filled with warm water about the temperature of your own body. (1000 cc water is a standard amount) Your bowels will tolerate some variance in temperature so long as it’s not too extreme. Hang the bag higher than your shoulder, higher than head height is even better, flush any air from the line. Attach the irrigation sleeve to the flange or by a belt, whichever method you prefer. Put the tailclip securely on the end of the sleeve. At this point you can sit down if you prefer; some people stand. You may have been given handouts by your ET that illustrate a gentleman, fully clothed, seated next to the toilet with an unclipped irrigation sleeve emptying directly into the toilet bowl. I’d strongly discourage a beginner from doing the procedure in this manner. It’s going to seem like you need four hands to keep track of things at first and I can pretty much guarantee you’ll soil that clothing. Wear as little as possible the first few times until you get the hang of things. As well, I’d discourage a beginner from letting the unclipped sleeve hang into the toilet bowl to drain. If you’re seated, the weight of the returning water will immediately pull the sleeve OUT of the bowl and you’ll have a mess to clean up. If you’re standing, it’s silly to stay rooted in one spot over the toilet for the duration of the procedure. So keep the clip on the end of the sleeve and let the whole apparatus hang if you are standing, or rest on the floor if you prefer to sit. Getting the cone and water in can be the biggest challenge. Stomas can react to being handled, or touched by something they sense is cold by retracting or ‘clenching up’ which might make inserting the cone difficult. Just take a little break and let the stoma relax and then try again. You don’t want to force the cone in -- halfway is plenty. A bit of lubricant on the cone will help. Water leaking out while you’re trying to get it in is another common annoyance. Try stopping and starting, using the on/off control on the bag -- there may be waste blocking things near the stoma opening. Stop the water, remove the cone, let things eject and start again. If you suspect the bowel is not returning as much as you put in you may be dehydrated -- your thoughtful colon, upon getting all this free water may simply decide to absorb it for you. Drink a glass of water and keep going. You may be able to infuse the entire 1,000 cc all at once, if you feel a cramp coming on, pause the water flow until it passes. Mild cramping is common to start off. Again, just stop the water, remove the cone and relax for a minute or so before resuming. The returning water and waste will begin not long after you’re done inserting the water. Return of waste may happen all at once, or in stages over about a half hour. Empty the sleeve into the toilet before it pulls uncomfortably on your flange or belt. After a few weeks, once you have mastered the basics of infusing water, you may wish to experiment with volume -- 1000cc may be too much for your particular bowels' optimal performance, or it may be too little. Increased amounts should be infused in stages to avoid cramping. Keep the sleeve on for a full hour the first few times, even if it seems like you finished up far earlier -- it’s wise to be cautious until you’ve had some time to see how your body is going to adapt to the new routine. You can walk around the house and get things done, have a coffee, read the paper or whatever while you’re waiting. After the hour, remove and rinse the sleeve, hang it and the irrigation bag up to dry. Use a little vinegar or bleach solution on the sleeve from time to time to help it stay free of scent. You’re now ready to start wearing the caps or mini bags different companies offer -- give everybody a call and get all the free samples you can. Try them all. As mentioned before, irrigation is by no means an exact science -- results can vary from individual to individual. The goal is to achieve freedom from waste between irrigations, however it’s not uncommon for small amounts to appear before the next session and one should not consider the results to be a failure if this is the case. Give yourself and your body time to adapt to the routine. This is all a lot simpler and easier than it sounds here. Learning to irrigate can seem complicted initially but you'll get the hang of it. I encourage new colostomy patients to contact [email protected] for an 'irrigation buddy' if you are considering the procedure. We can provide experienced mentors to help you along. * That's the party line. I'm supposed to say it. Fact is, few doctors or surgeons have the slightest clue about living with an ostomy, let alone irrigation. Your NSWOCC is a far better resource. HOWEVER, If your NSOCC is discouraging you from trying irrigation by telling you once you start you cannot stop because the bowel won't work anymore without stimulation, they clearly don't know much about the subject either. Find a more knowledgeable NSWOCC or contact the webmaster at [email protected]. Thank you to Mich from Amsterdam -- my first support, my irrigation mentor, my friend. I'm sorry cancer took you in the end. Thanks for handing me the torch, buddy. I'll always carry it for you. |

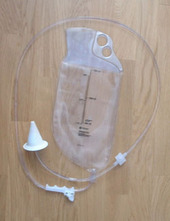
A Hollister irrigation bag with tubing and cone. Convatec and Coloplast also make irrigation bags and sleeves.

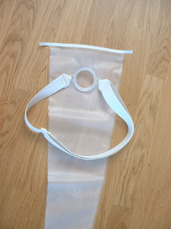
An Irrigation sleeve and belt.

Want proof that it works? The man pictured at left is competing in a triathelon. He is wearing a patch to protect his ostomy.
|